Appearance
E911 Location Discovery for Cisco CallManager
Overview
Call Telemetry provides automatic E911 location discovery for Cisco IP phones, identifying exactly where 911 callers are located - down to the building, floor, and room level. When someone dials 911, the system instantly discovers their physical location using CDP neighbor data, subnet mapping, and switch port information.
Unlike traditional E911 solutions that rely on static databases, Call Telemetry performs real-time discovery during the emergency call, ensuring accurate location data even for phones that have moved or remote workers.
Key Benefits
- Instant Location Discovery: Real-time identification of caller location during 911 calls
- No Manual Updates: Automatic discovery eliminates static location database maintenance
- Multi-Level Accuracy: From building-level down to specific room or desk location
- Remote Worker Detection: Distinguish between on-site and VPN/remote callers
- No SNMP Required: Works without complex switch configurations
- CER Integration: Enhances Cisco Emergency Responder with enhanced location data, modern alert channels, and workflows.
- Multiple Alert Channels: SMS, email, Teams notifications to security teams
How Location Discovery Works
Hierarchical Location Matching
Call Telemetry uses a hierarchical matching system to find the most accurate location for each 911 caller. The system checks multiple data sources in order of specificity:
Phone Location (Most Specific)
- Exact device location (e.g., "Reception Desk", "Security Station")
- Linked directly to phone MAC address
- Provides room-level or desk-level accuracy
Port Location
- Room-level accuracy based on switch port
- Maps physical wall jacks to specific rooms
- Ideal for fixed desk phones
Switch Location
- IDF/Closet level location
- Provides floor or building section accuracy
- Useful when port-level data isn't available
Subnet Location (Least Specific)
- Building or floor-level location
- Covers entire network segments
- Fallback for VPN/remote users
Real-time Discovery Components
Phone Discovery App - Gathers comprehensive phone data:
- RIS (Real-time Information Service) for live phone status
- CDP/LLDP neighbor discovery for switch and port
- Network topology and traceroute analysis
- AXL integration for device pool information
- Automatic subnet detection (IPv4 and IPv6)
Location Database - Maintains emergency location data at multiple levels:
- Phone-specific locations
- Port-level room assignments
- Switch closet locations
- Subnet building/floor mappings
Realtime API Integrations to other systems:
- Additional Location Data for Dispatchable Location
- Nework CMDBs or Inventory systems
- Emergency response systems
- Building management
- Security systems
- Mass notification platforms
Location Mapping Tools
QR Code Wire Mapping tool for Technicians
- Utilizes QR Codes for easy to scan location data
End User Location Checks Address verification
Automated Discovery Process
When a 911 call is placed, Call Telemetry automatically executes a comprehensive discovery pipeline:
Initial Call Capture (< 1 second)
- CURRI API receives 911 call event
- Extracts calling device name and number
- Triggers discovery pipeline
Real-time Phone Discovery (1-3 seconds)
- Queries RIS for live phone registration status
- Retrieves CDP/LLDP data from phone web interface
- Identifies connected switch and port
- Performs network path traceroute
- Determines phone subnet (IPv4/IPv6)
Location Resolution (< 1 second)
- Checks hierarchical location database
- Returns most specific match available
- Includes address, building, floor, room details
Alert Generation (< 1 second)
- Populates templates with discovered data
- Sends to configured channels (SMS, Email, Teams)
- Logs complete discovery results
The entire process completes in under 5 seconds, providing emergency responders with accurate, real-time location data.
Requirements
- Call Telemetry Appliance 0.7.0 or higher
- Call Telemetry Premium
- Cisco Callmanager version 11.5.1.13900-42 (SU3) or higher.
- Versions below this can still get 911 alerts and notifications but without dispatchable emergency location data, as this version provides the phone device name in the call event.
- Administrator access to Cisco Callmanager
- Enable Web access on Callmanager Cisco IP Phones to obtain CDP and LLDP, and Subnet Data
- Configured Active Call Policy Inspection - add a Policy, and apply it to your 911 Route Pattern or Translation Pattern.
Augmenting Cisco Emergency Responder
If you have Cisco Emergency Responder (CER), Call Telemetry enhances it with real-time location discovery and modern alerting. Unlike CER's static database, Call Telemetry discovers current location data during each 911 call.
Simply attach a monitoring External Call Control Profile for Call Telemetry onto your 911 pattern for Emergency Responder. CER continues to do the ELIN transformations, and Call Telemetry gives you additional location and alert workflows, including new call alert channels like SMS, Email, and Webex Teams.
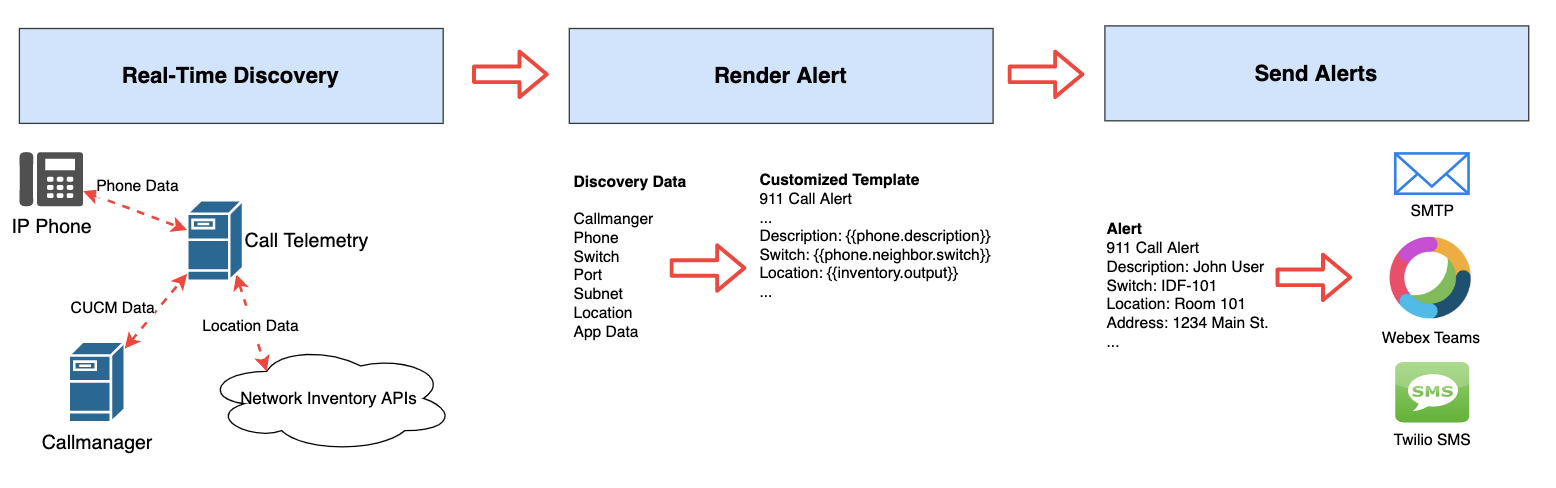
Realtime Call Discovery and Alerts
The following diagram provides a high-level overview of the realtime discovery and alerting process. Call Events trigger the discovery process, which then populates the alert template with the discovered data. The alert is then sent to the configured alerting channels.
Emergency Phone Location Data Sources
Dispatchable 911 location requires multiple data points to accurately locate callers. Call Telemetry automatically discovers and correlates all available location sources during emergency calls.
Data Discovered from Cisco Systems
Phone Configuration (from CUCM)
- Device name and model
- Extension and description
- Device pool assignment
- Registration status
Live Network Data (from Phone)
- CDP neighbor: switch name, IP, and port
- LLDP data as CDP alternative
- Phone IP address and subnet
- Network path via traceroute
Location Enhancement Options
- Map subnets to buildings, floors, rooms
- Identify remote/VPN connections
- Support dynamic CSV updates
External Integrations
- SOAP Query App - Query CMDB systems via SOAP/XML for detailed location data
- ServiceNow CMDB App - Native ServiceNow integration for asset and location discovery
- Meraki Lookup App - Cisco Meraki Dashboard integration for switch/port locations
- Building management APIs
- QR code physical verification
- Custom webhook lookups
Example Location Match Response
When the Phone Discovery App finds a location, it provides structured data showing which level matched:
json
{
  "location": {
    "address": "123 Main St, Boston, MA 02101",
    "address_text": "Boston-HQ",
    "near": "Conference Room 201",
    "port": "GigabitEthernet1/0/5",
    "switch": "BOSHQ-IDF2-SW01",
    "match": "port",  // Shows port-level accuracy
    "output": "Port-level location identified"
  }
}
The match field indicates location accuracy: phone (most specific), port, switch, or subnet (least specific).
Building 911 Emergency Call Alert Templates
Call Alerts can be triggered on any matching call event, and have the capability to reference workflow variables, which are dynamically substituted with their real values when the alert is executed. These variables are encapsulated within double curly braces in the alert template.
The following example screen shows an example rule alert template, with data sources and variables available. 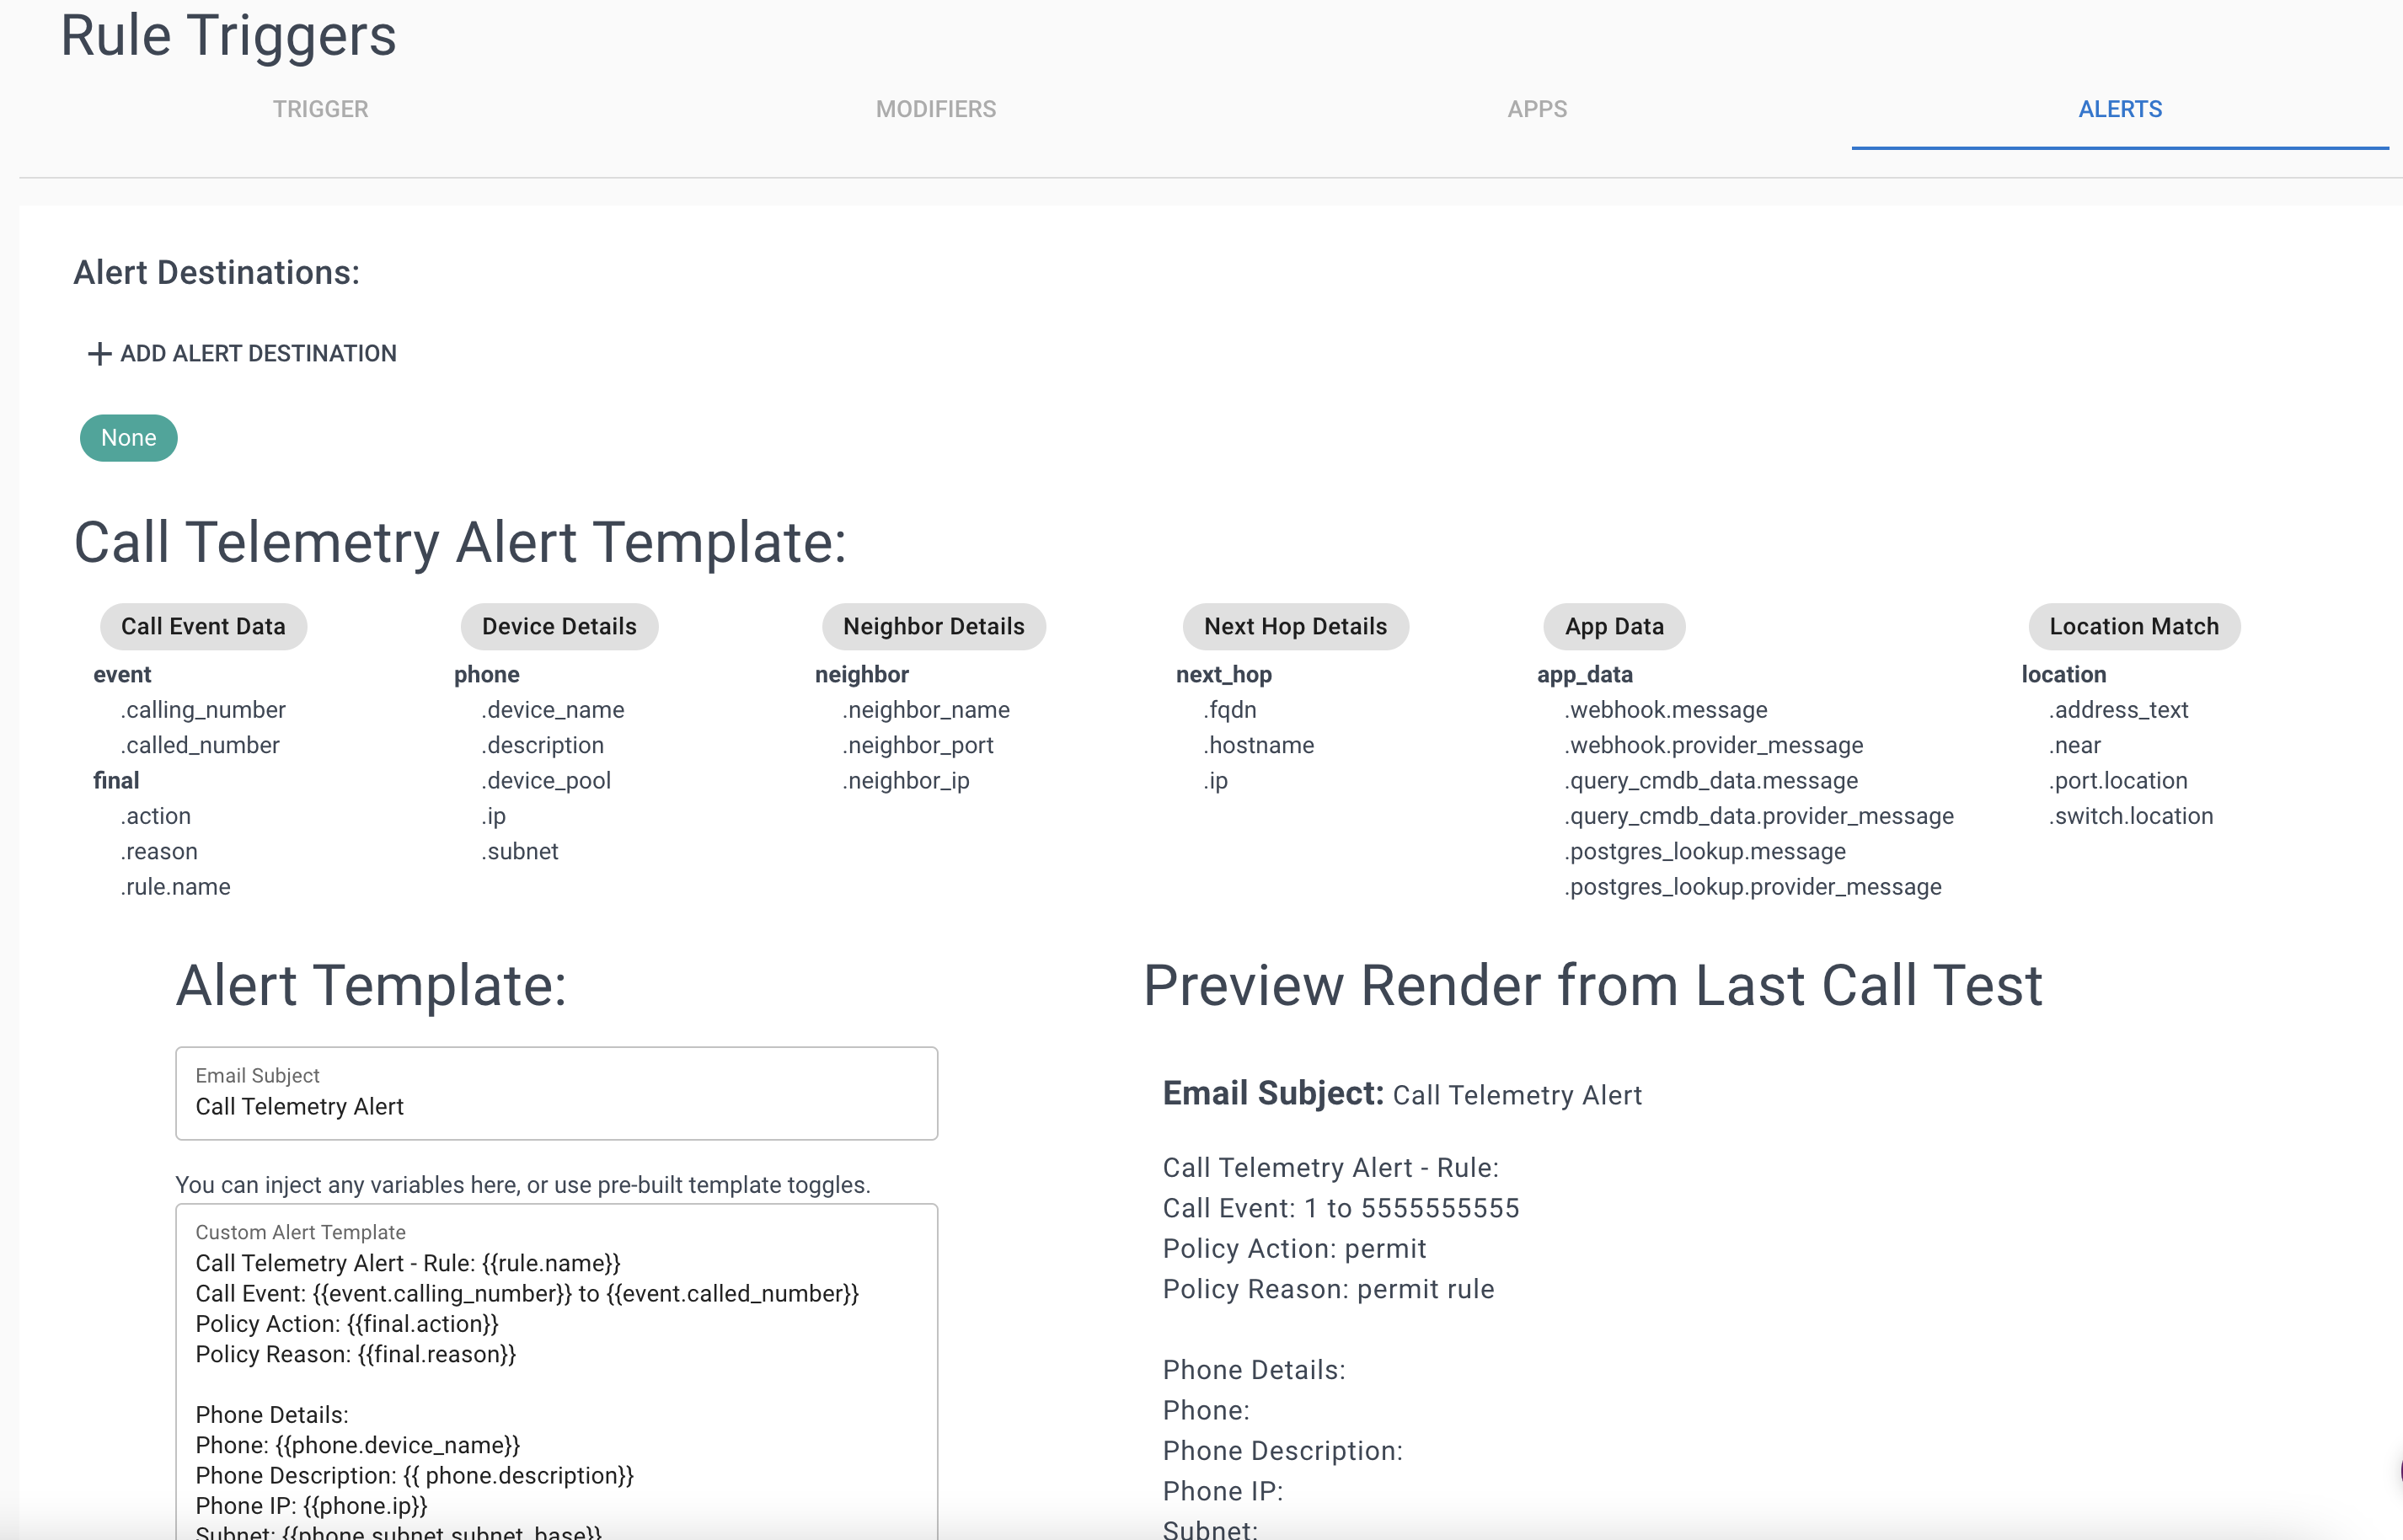
You can learn more about alert templates in Configuring Call Alerts
Example Data Context
Here's an example payload available after a successful discovery. You can use any of these fields in custom alerts or apps. You can further query APIs to build in more data to this context.
json
{
  "event": {
    "called_number": "1001",
    "calling_devicename": "SEP000832C78E0F",
    "calling_number": "231",
    "id": 21331,
    "trigger_point_type": "translation_pattern"
  },
  "final": {
    "action": "permit",
    "modifiers": {
      "calledname": null,
      "callednumber": null,
      "callingname": null,
      "callingnumber": null
    },
    "reason": "permit rule",
    "rule": {
      "name": "test3",
      "greeting_enabled": false,
      "greeting_name": "Jason",
      "calling_number": ".*",
      "called_number": "1001",
      "policy_action": "permit"
    }
  },
  "phone": {
    "description": "Demo Phone - Room 101",
    "device_name": "SEP000832C78E0F",
    "device_pool": "Default",
    "extension": "1001",
    "firmware": "14.1.1.0001.136",
    "ip": "192.168.123.218",
    "location": {
      "address": {
        "name": "Home",
        "address1": "1234 Main St",
        "address2": null,
        "city": "Fairhope",
        "state": "AL",
        "zip": "36532"s
      },
      "address_text": "1234 Main St  Fairhope,AL 36532",
      "match": "port",
      "near": "IDF-Room101 Floor 1, NE Corner of Building.",
      "port": {
        "name": "GigabitEthernet1/0/15"
      },
      "switch": {
        "name": "Switch",
        "location": "IDF-Room101 Floor 1, NE Corner of Building.",
        "ip": "192.168.123.214"
      }
    },
    "model": "Cisco 7821",
    "neighbor": {
      "neighbor_ip": "192.168.123.214",
      "neighbor_name": "Switch",
      "neighbor_port": "GigabitEthernet1/0/15"
    },
    "next_hop": {
      "fqdn": "Switch",
      "hostname": "Switch",
      "ip": "192.168.123.214",
      "output": null
    },
    "ris_data": {
      "ActiveLoadID": "sip78xx.14-1-1-0001-136",
      "Description": "Demo Phone - Room 101",
      "DirNumber": "1001",
      "IPv4": "192.168.123.218",
      "Model": "Cisco 7821",
      "Name": "SEP000832C78E0F",
      "Status": "Registered",
      "StatusReason": "0"
    },
    "status": "Registered",
    "status_reason": "",
    "subnet": "192.168.123.0/24"
  }
}