# Block calls from your Cisco IP Phone using the MCID Softkey
# Feature Overview
This feature enables your users to block calls from their Cisco IP Phone using the native MCID softkey. It allows users to quickly and easily block calls without having to call the helpdesk, or create a ticket.
All user submitted rules are centrally managed by the policy server, not local to the Cisco IP Phone software.
This native softkey creates a unique calling + called number global block rule entry based on the call reported. This process is flagged in CDR using the native MCID flag, and processed by the Call Telemetry server 's built in SFTP CDR processing service.
# Feature Requirements:
- Call Telemetry Server Appliance 0.4.0 or higher
- Call Telemetry Advanced (opens new window) License or Demo License (opens new window)
- Cisco Callmanager 8.5 or higher with CDR Integration to Call Telemetry
- Active External Call Control Policy Inspection - A route pattern, translation pattern, or phone extension must be enabled for Call Telemetry Policy inspection. If Call Telemetry is not inspecting the call, it will not be able to see the ip phone call history.
# Cisco MCID Feature Overview
Cisco defines a MCID is a Malicious Caller ID comment within CDR Accounting data. This feature was released in Cisco Callmanager 4.0.1 in 2004. MCID is a softkey on the phone built into Callmanager. When the user is on a call, they can press "MCID", this will flag the call in CDR records. CallTelemetry Server will process CDR and look for the flag, and add it to the Global Blocked Call List. The record will be linked to the calling and called number of the call.
# Configure Call Blocking Settings
Before you can use the MCID Softkey, you must configure the Call Blocking settings in the Call Telemetry Server, and enable the softkey on your Cisco IP Phones.
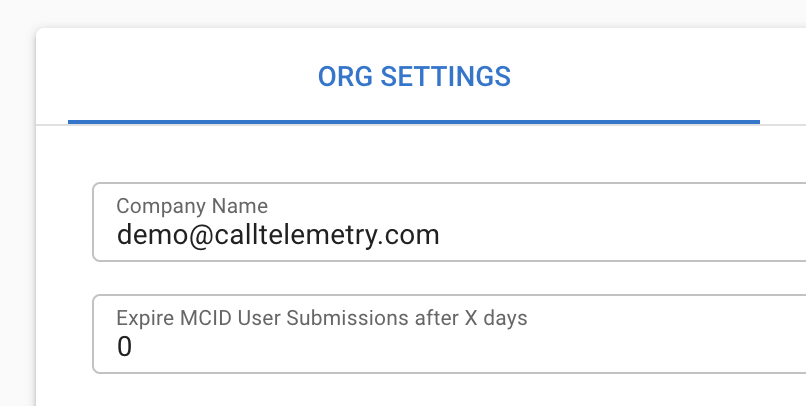
# Set an Auto Expire on user submitted blocked numbers
Blocked call reports can optionally auto expire after a certain number of days if your organization does not want to permenantly block a caller.
# Configure Blocked Call Auto Expiration
Auto expiration is an Advanced feature that allows you to set a time limit on how long a blocked call will be enforced. After this time it will be automatically removed from the list.
To configure it, from the Settings page in Call Teleemtry, click the Blocking tab. Toggle the slider to enable the feature, and set the number of days you want the blocked call to expire.
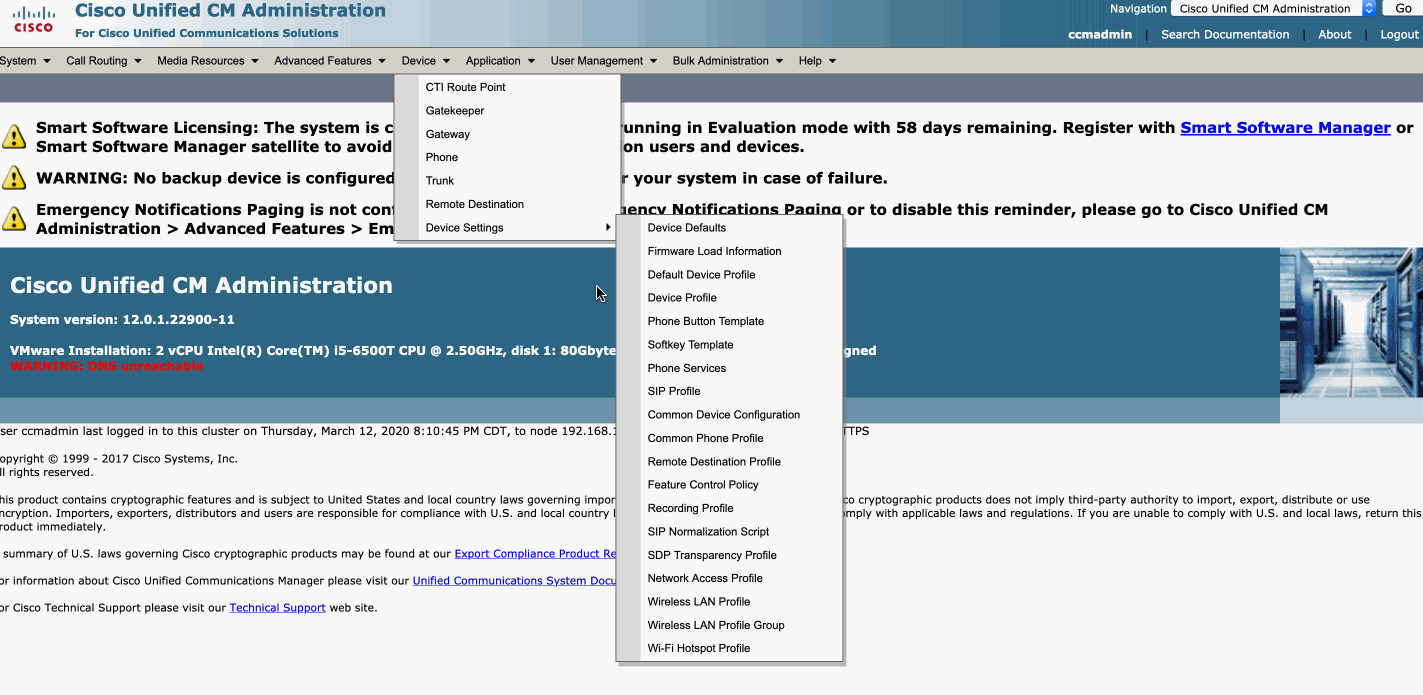
# Enable the MCID Softkey on your Cisco IP Phones
This step will add the MCID Softkey to the default softkey template. Without this step, the user will not see the MCID button.
From within Cisco Callmanager, follow these steps to add the MCID softkey to your softkey template:
- Device -> Device Settings -> Softkey Features
- Copy the Default Softkey to a new template
- Go to Softkey Configuration
- Go to Connected State
- Add MCID Softkey
- Apply softkey to phones, or set as Default
# Block a call using the MCID Softkey
Let's walk through an example of how a user can use the MCID softkey to block an incoming call.
- Press the MCID softkey on your phone during an active call. Depending on your softkey layout, the user may have to press the "more" button to see it.
- The Cisco IP phone screen will show MCID Successful. This means it has flagged the call in CDR. The call will be processed by the Call Telemetry server, and added to the Blocked Call List in a the next CDR Upload cycle, which is usually 1 minute for most systems.

TIP
MCID submissions only apply to the phone that submitted them. Blocks are unique per calling number and called line.
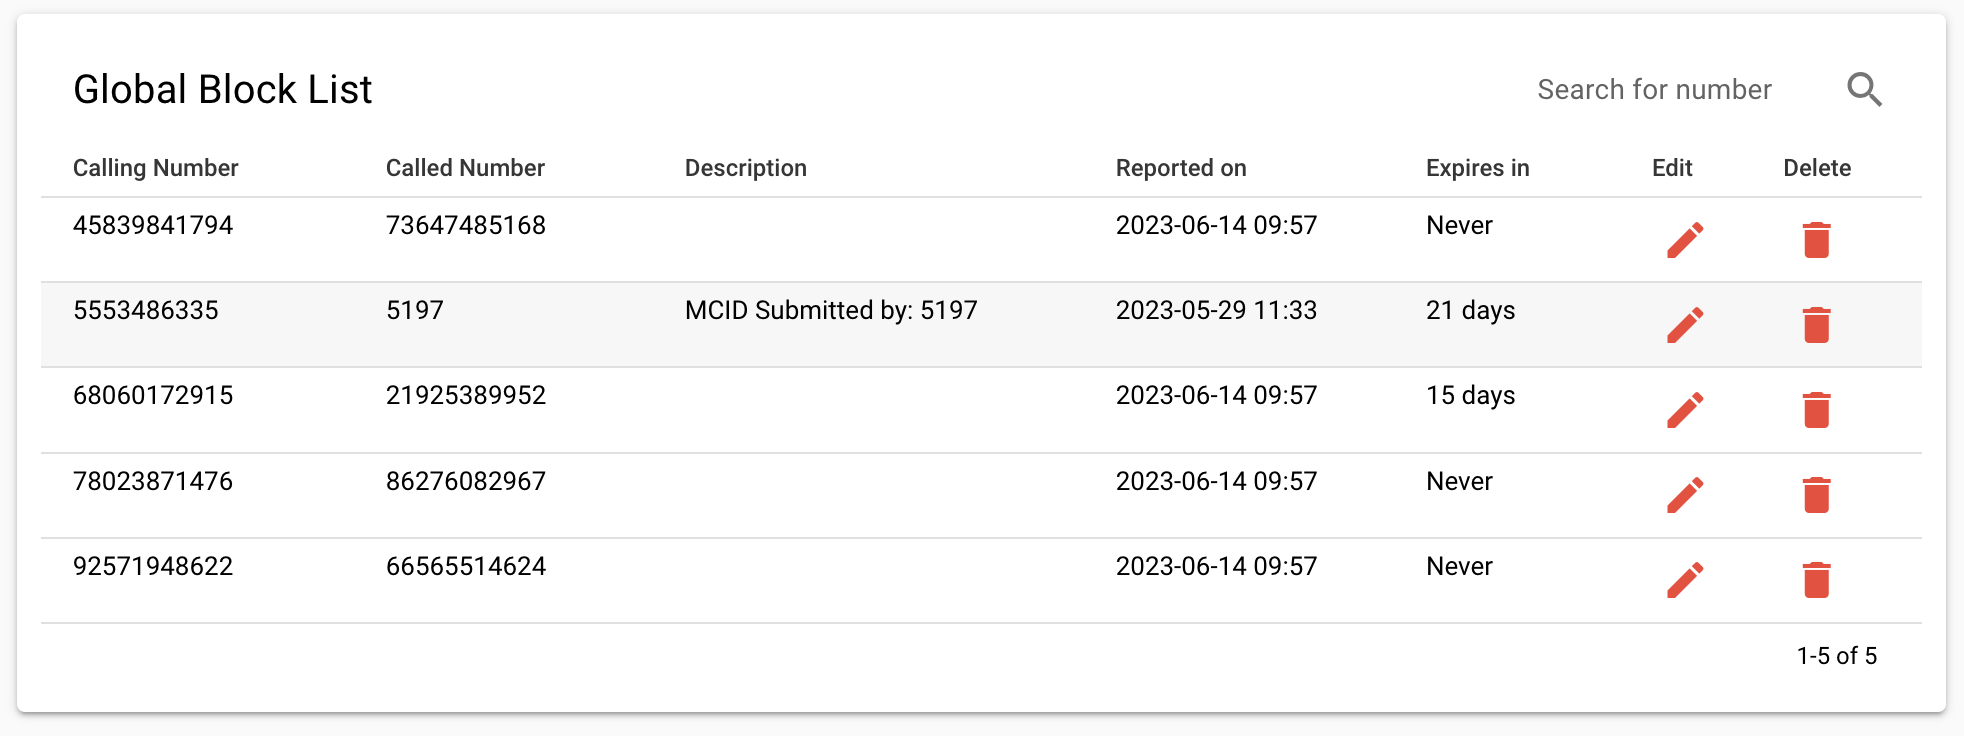
# Reviewing the Global Blocked Call List as an Administrator
When a user submits a blocked call, they will show up in the Global Block List page. Below is an example block list entry generated by the Cisco IP Phone 5197. Note that that rule only applies to that unique combination, and will not block calls for other users.
# Managing your Call Block List from the Cisco IP Phone
On phones with larger screens, you can also use an XML service to both block from call history, and manage your block list. Please see the Cisco IP Phone XML Service documentation for more information.